2024年12月31日 星期二

ubuntu 20.04 安裝 CUDA 12.2 for RTX 3060


這兩天按照之前自己寫的步驟來裝 NV Driver

結果又有問題了

裝到 cuda 的時候,出現以下畫面


重新來來回回弄好了幾遍

就是不行,順道提一下清除指令如下

sudo apt-get --purge remove nvidia-* <-- 新發現                             sudo apt-get --purge remove "*nvidia*" <-- 新發現                                                                                                                                                      sudo apt purge nvidia* -y                                                       sudo apt remove nvidia-* -y                                                                             sudo rm /etc/apt/sources.list.d/cuda*                                                             sudo apt autoremove -y && sudo apt autoclean -y                                          sudo rm -rf /usr/local/cuda*                                                                        

另外記錄一下幾個可能有用的指令

* 查看驅動版本號

sudo dpkg --list | grep nvidia-*

-----------------------------------------------------------------------------------

簡單來說

之前安裝 driver 的部分是沒問題的

可以按照之前的說明安裝

但 driver 535 版本看起來是 CUDA 12.2 

所以這次就改裝 12.2 吧

首先,到以下網址

https://developer.nvidia.com/cuda-12-2-0-download-archive

要裝在 ubuntu 20.04 上

所以選 linux -> x86_64 -> Ubuntu -> 20.04 -> runfile (local)

然後出現

Installation Instructions:
wget https://developer.download.nvidia.com/compute/cuda/12.2.0/local_installers/cuda_12.2.0_535.54.03_linux.runsudo sh cuda_12.2.0_535.54.03_linux.run

照著做,執行 sh 後,他會說已偵測到有其他安裝程式之類的

強烈建議你不要繼續,別理他,選繼續

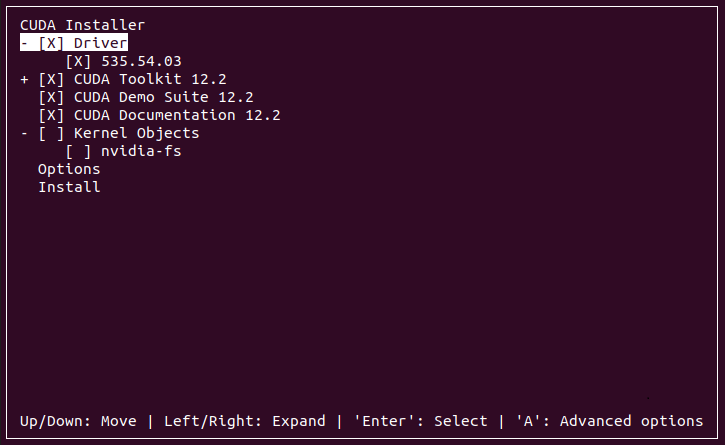
會出現以下畫面

這真的讓人搞不懂

前面的X到底是要選還是不要選

答案是,有X是要選的

driver 我們剛才裝過了

註 : 這個 sh 也能安裝 driver,但似乎要 OS 進入 cmd 模式才行? 不確定是不是但太麻煩了

所以只要選 CUDA 就好

安裝完成後他會說找不到 driver 之類的

不用理他,我們可以用以下指令檢查

nvidia-smi       <-- driver 有安裝才會 work

nvcc -V          <-- cuda 有安裝才會 work

但是在使用 nvcc -V 之前,還得自行更新 library path 的位置

指令如下

# setup your paths                                                                                                                                                 echo 'export PATH=/usr/local/cuda-12.2/bin:$PATH' >> ~/.bashrc                                                                     echo 'export LD_LIBRARY_PATH=/usr/local/cuda-12.2/lib64:$LD_LIBRARY_PATH' >> ~/.bashrc                      source ~/.bashrc                                                                                                                                                 sudo ldconfig                                                                                                                                                    

成功的話 nvcc -V 之後就會出現 cuda 的版號

失敗的話可以用最上面提到的清除指令重來

--------------------------------------------------------------------------------------

再來要安裝 cuDnn,先到以下網址

https://developer.nvidia.com/rdp/cudnn-archive

其實 cuDnn 已經到 9.x 了

但我是 RTX 3060 應該不用那麼新吧

總之我是選了 cuDNN v8.9.7 (December 5th, 2023), for CUDA 12.x 這個

NV 還要你註冊才給你下載,就註冊吧,下載完就像下面這樣

然後用以下指令安裝 cuDnn

CUDNN_TAR_FILE="cudnn-linux-x86_64-8.9.7.29_cuda12-archive.tar.xz"                                        sudo tar -xvf ${CUDNN_TAR_FILE}                                                                                                     sudo mv cudnn-linux-x86_64-8.9.7.84_cuda12-archive cuda                                                             # copy the following files into the cuda toolkit directory.                                                                  sudo cp -P cuda/include/cudnn.h /usr/local/cuda-12.2/include                                                      sudo cp -P cuda/lib/libcudnn* /usr/local/cuda-12.2/lib64/                                                             sudo chmod a+r /usr/local/cuda-11.2/lib64/libcudnn*                                                                    


這些都做完後

自己開個 pytorch 的專案來跑一下訓練

是有用 gpu 在跑的 !

以上做個紀錄

2024年12月2日 星期一

flask 連線遠端 mysql 主機

在上一篇文章中

我們已經安裝好一台 ubuntu 20.04 並安裝了 mySQL ,版本是 8.0.44

現在我們在另一台電腦(windows)上開發 flask


一個最簡單的 flask 寫法如下

from flask import Flask

app = Flask(__name__)

@app.route('/')
def hello():
return 'Welcome to My Watchlist!'

if __name__ == '__main__':
app.run(debug=True)

然後需要安裝 mySQL client 的套件,我選的套件是 mysql-connector-python

所以安裝方法就是  pip install mysql-connector-python

這裡有個坑,套件名稱千萬不要打成 mysql-connector

延伸閱讀


安裝好之後可以把程式改成下面這樣

from flask import Flask
import mysql.connector
from mysql.connector import Error

app = Flask(__name__)

# Establish the connection
def get_db_connection():
try:
conn = mysql.connector.connect(
user='mike',
password='pass',
host='192.168.0.31',
port=3306,
database='ocrDB',
autocommit=True
)
return conn
except Error as e:
print(f"Error: {e}")
return None


@app.route('/')
def hello():
conn = get_db_connection()
cursor = conn.cursor()
cursor.execute('SHOW TABLES')
tables = cursor.fetchall()
cursor.close()
conn.close()
return 'Welcome to My Watchlist!'


if __name__ == '__main__':
app.run(debug=True)

然後執行,觸發 def hello() 就會報錯了

詢問 chatgpt 後歸納成幾個原因

Summary of Steps to Resolve:

  1. Ensure MySQL is running on 192.168.0.31.
  2. Open port 3306 on the firewall of the MySQL server.
  3. Update MySQL bind-address in the configuration to allow remote connections.
  4. Grant remote access privileges to the MySQL user.

1. 在 mySQL 安裝的 ubuntu 上輸入 sudo service mysql status 即可確認 

2. 這邊 chatgpt 丟出了一句 sudo ufw allow 3306

首先 ufw 應該是預設有安裝的,但我們可以檢查一下狀態

$ ufw enable            // 啟動防火牆,執行後開機也會自動啟動

$ ufw disable           // 關閉防火牆

$ ufw status            // 查看防火牆狀態

$ ufw status verbose    // 查看防火牆詳細狀態

基本上就是把 3306 port 打開,這部分沒啥問題

延伸閱讀


3. 這邊 chatgpt 說

On the MySQL server, check the MySQL configuration file (my.cnf or my.ini), usually located in /etc/mysql/my.cnf or /etc/my.cnf (depending on the distribution). Ensure that the bind-address is set to either 0.0.0.0 or the specific server IP. Example:

bind-address = 0.0.0.0

沒問題,就按照它說的去改

在我的環境中,設定檔是位於 /etc/mysql/my.cnf

改好之後重新啟動 mySQL

sudo systemctl restart mysql

然後 mySQL 就掛了!

google 一下發現有人說你得寫成下面這樣才行

[mysqld]
bind-address = 0.0.0.0

存檔,重啟 mySQL 就成功了

延伸閱讀


4. 在上一篇文章我們就有授權給 remote user 了

所以這部分沒問題

順道一提這個 database='ocrDB' 是我事先在 ubuntu 上用 mySQL command line 開好的

改到目前這樣就可以用 debug 模式看到 cursor 拿回來的 table 是空的 (因為還沒開 table)

沒有 error 出現,可以順利跑完

以上,做個初學者紀錄,這篇就講到這